
Research conducted in 2022 demonstrated that around 27% of internet traffic consists of malicious bots. Due to such a frequent occurrence of the phenomenon, it is better to prevent it rather than cure its effects later. A great weapon in the fight against harmful bots is installing a Google reCAPTCHA. After all, only when you no longer have to worry about your website’s security, you can fully concentrate on creating great content! WordPress ranks among the top choices for website creation and management, with nearly 46% of websites in 2023 relying on this software. Therefore, in this article, we will present a simple way to integrate reCAPTCHA plugins into your WordPress site!
How to add reCAPTCHA to WordPress site
Plugins are the easiest way for a publisher to make changes to their WordPress website. With their great numbers and astonishing ease of use, they are the undeniable go-to for pretty much every person creating content using this platform. In this article, we recommend two reCAPTCHA plugins to choose from: reCaptcha by BestWebSoft and Advanced Google reCAPTCHA. We will describe them later in this article, because before installing any of these plugins, you must first download special keys that are necessary for the installation process. Here’s how to do it:
How to generate reCAPTCHA keys
1. Sign in to your Google account;
2. Go to reCAPTCHA Admin Console. There, you’ll see a registration form set for reCAPTCHA Enterprise by default. If you wish to opt for a classic reCAPTCHA, click “Switch to create a classic key”;

3. Fill in the form to register your website:
- enter a Label – your website label for you to easily find it in the future,
- choose the reCAPTCHA type – it can be either v3 (score-based) or v2 (a challenge). In the second option, you can pick “I’m not a robot” checkbox or an invisible badge (if you’ve selected the classic key, you can also choose the solution for Android apps),
- insert Domains that you wish to register – the registration will apply for all the subdomains within the entered domains. In the case of reCAPTCHA for Android – here, you’ll have to insert Packages,
- if you’ve chosen the classic key, provide the domains’ (or packages’) Owners by entering their e-mail addresses. Below, you can also mark a “Send alerts to the owners” checkbox to get a notification each time Google detects issues with your site or app,
- if you’ve selected the Enterprise key (and you haven’t used Google Cloud before), click the GOOGLE CLOUD PLATFORM to create a project within your domain. In order to do that, type in the “Project Name” and pick the proper domain from the “Create in” list;
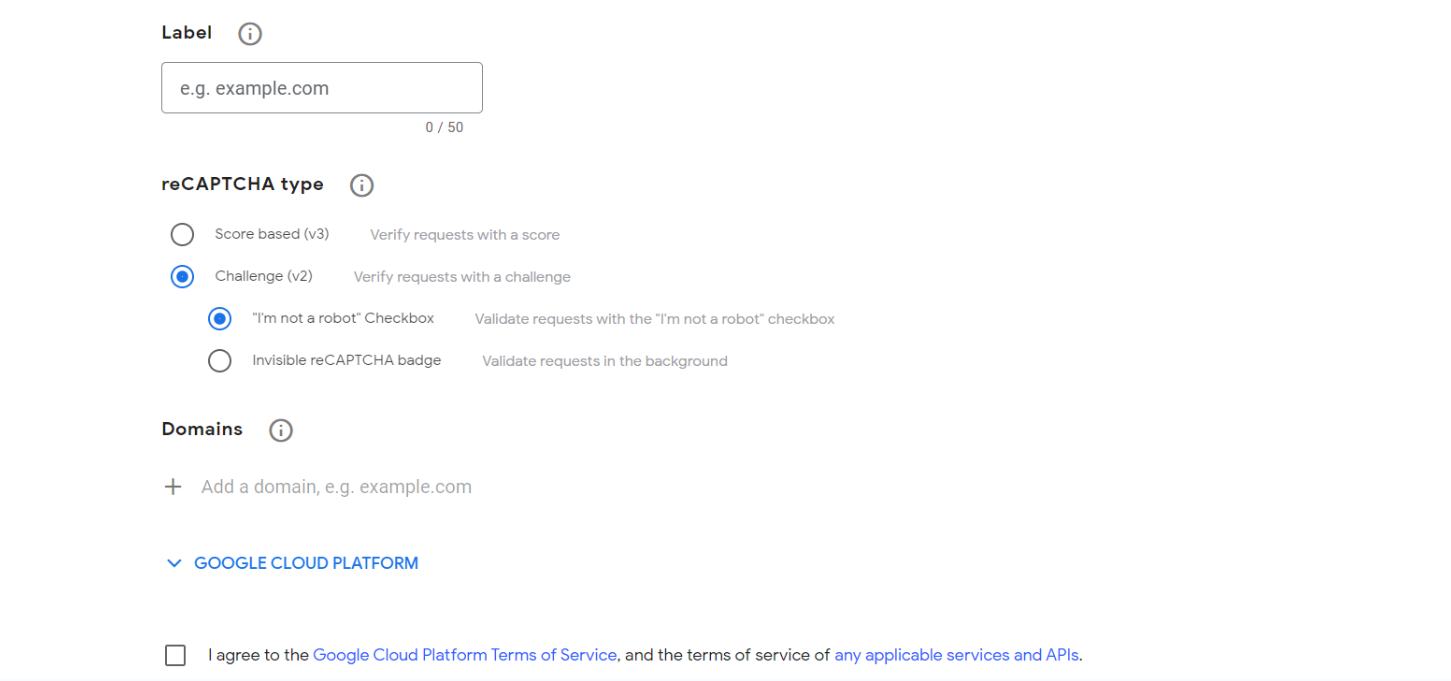
4. Once you agree to the Terms of Service, click the “SUBMIT” button;
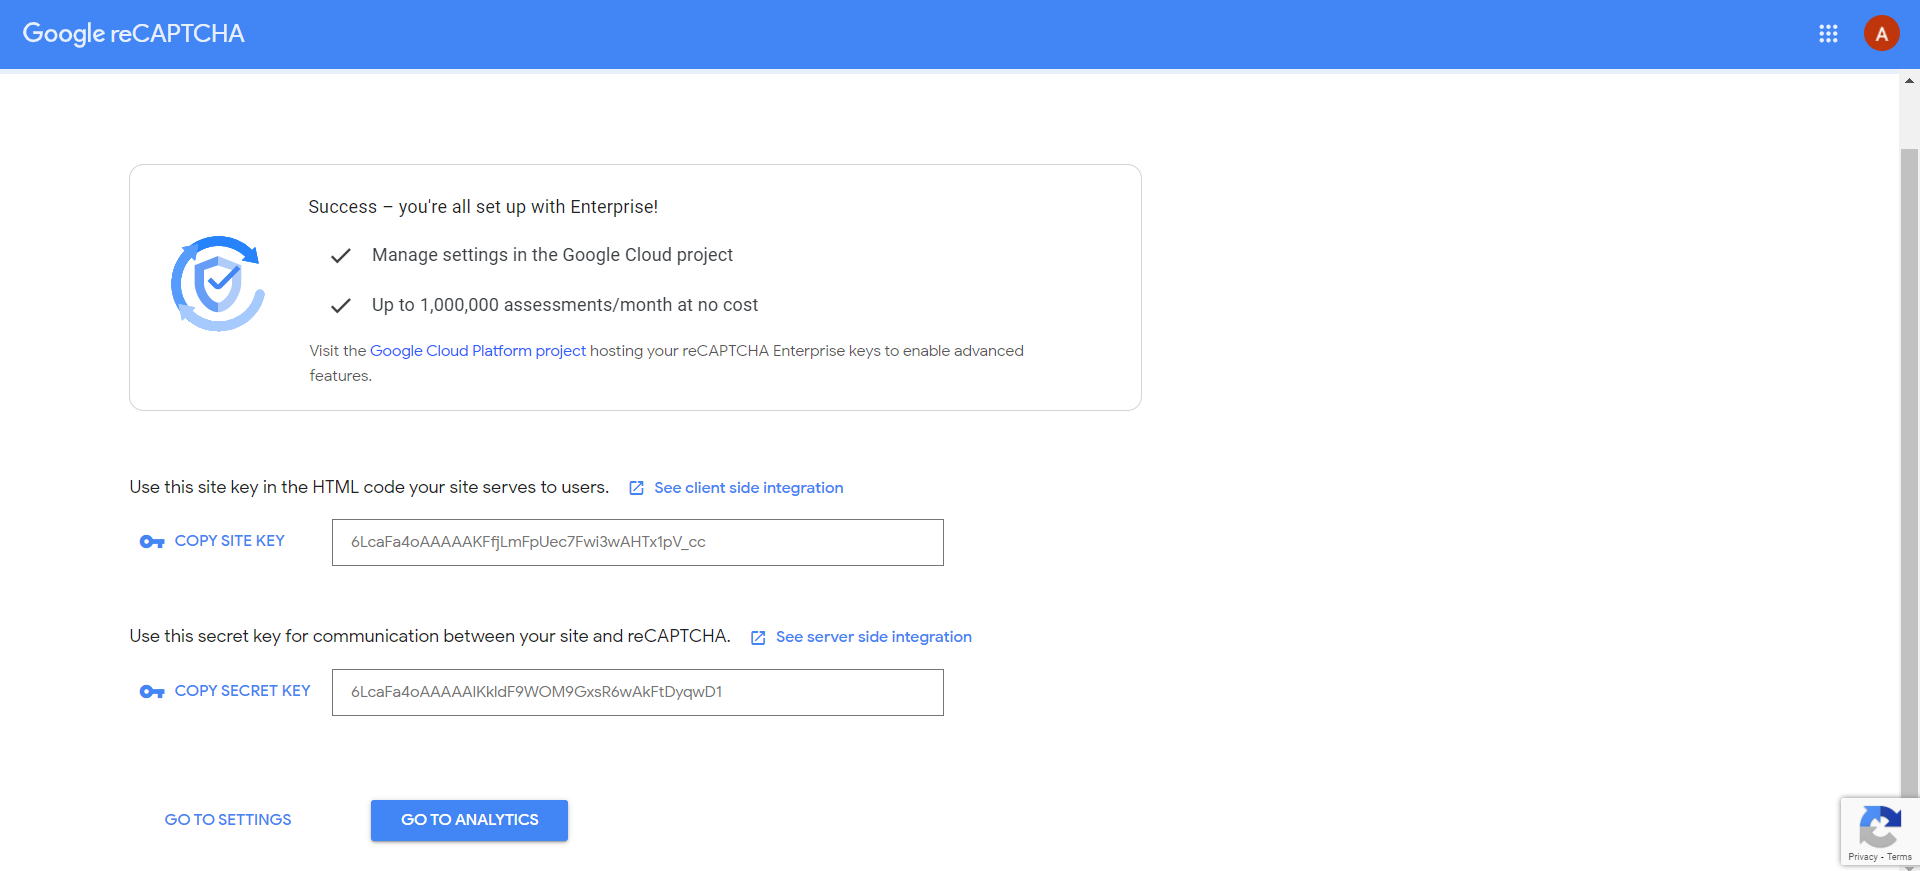
5. After that, you will see two freshly generated keys: SITE KEY and SECRET KEY – copy and save both for later.
Now it’s time to choose the reCAPTCHA plugin. Consider selecting between these two recommended ones:
- reCaptcha by BestWebSoft plugin that was downloaded more than 200 thousand times, has a 4-star rating (out of 5), and is compatible with, among others, registration, contact or comment forms (and also ones like WPForms, Caldera Forms, Elementor Pro Contact Forms, but only after buying subscription that cost around 24$ a year). The plugin is available in 12 languages: English, Czech, French, German, Japanese, Italian, Portuguese, Romanian, Russian, Spanish, Turkish, and Ukrainian;
- Advanced Google reCAPTCHA is a free-of-charge plugin that is compatible with many forms, including WooCommerce, Easy Digital Downloads, and BuddyPress. It has a 5-star rating and was downloaded more than 80 thousand times. The plugin is available in 14 languages: Czech, Dutch, English (Australia), English (Canada), English (US), Hindi, Indonesian, Japanese, Nepali, Persian, Russian, Slovak, Spanish, and Swedish.
How to install reCaptcha by BestWebSoft
1. Log in to your WordPress Dashboard, go to the “Plugins” tab located on the left sidebar, and click “Add New”;
2. In a search bar, type “reCaptcha” – the name of the plugin;
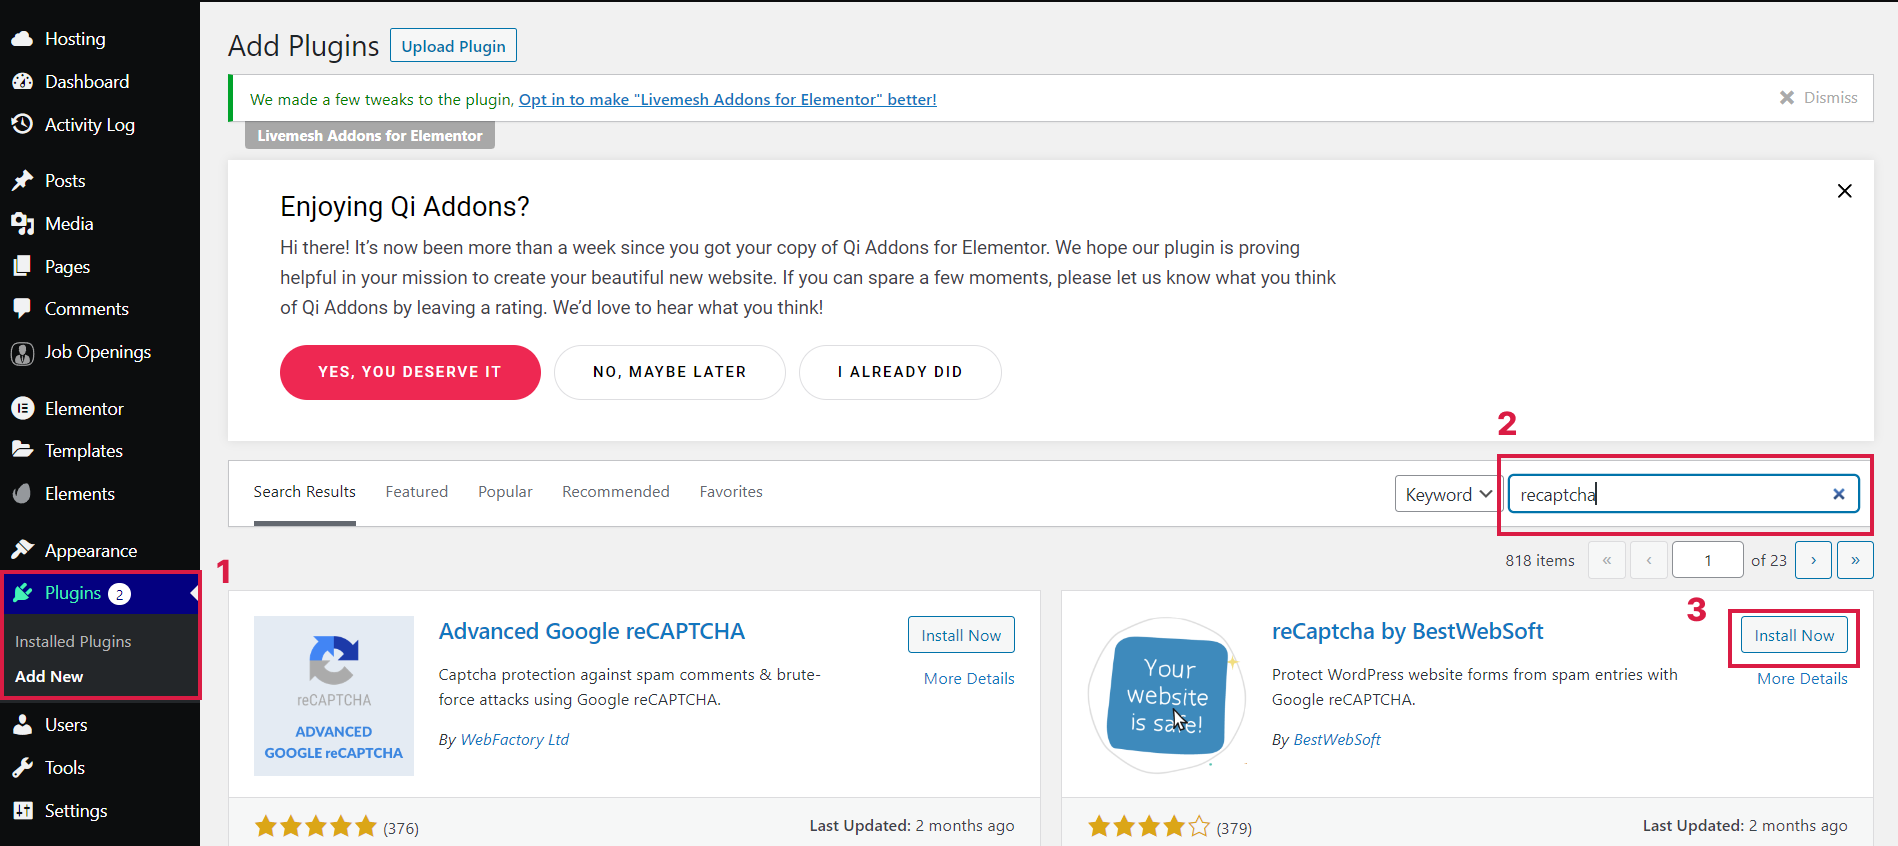
3. After finding the plugin on the result list, click “Install Now” and after a while, when a button “Activate” appears, click it;
4. Proceed to the freshly appeared “reCaptcha” tab that appeared on the sidebar menu;
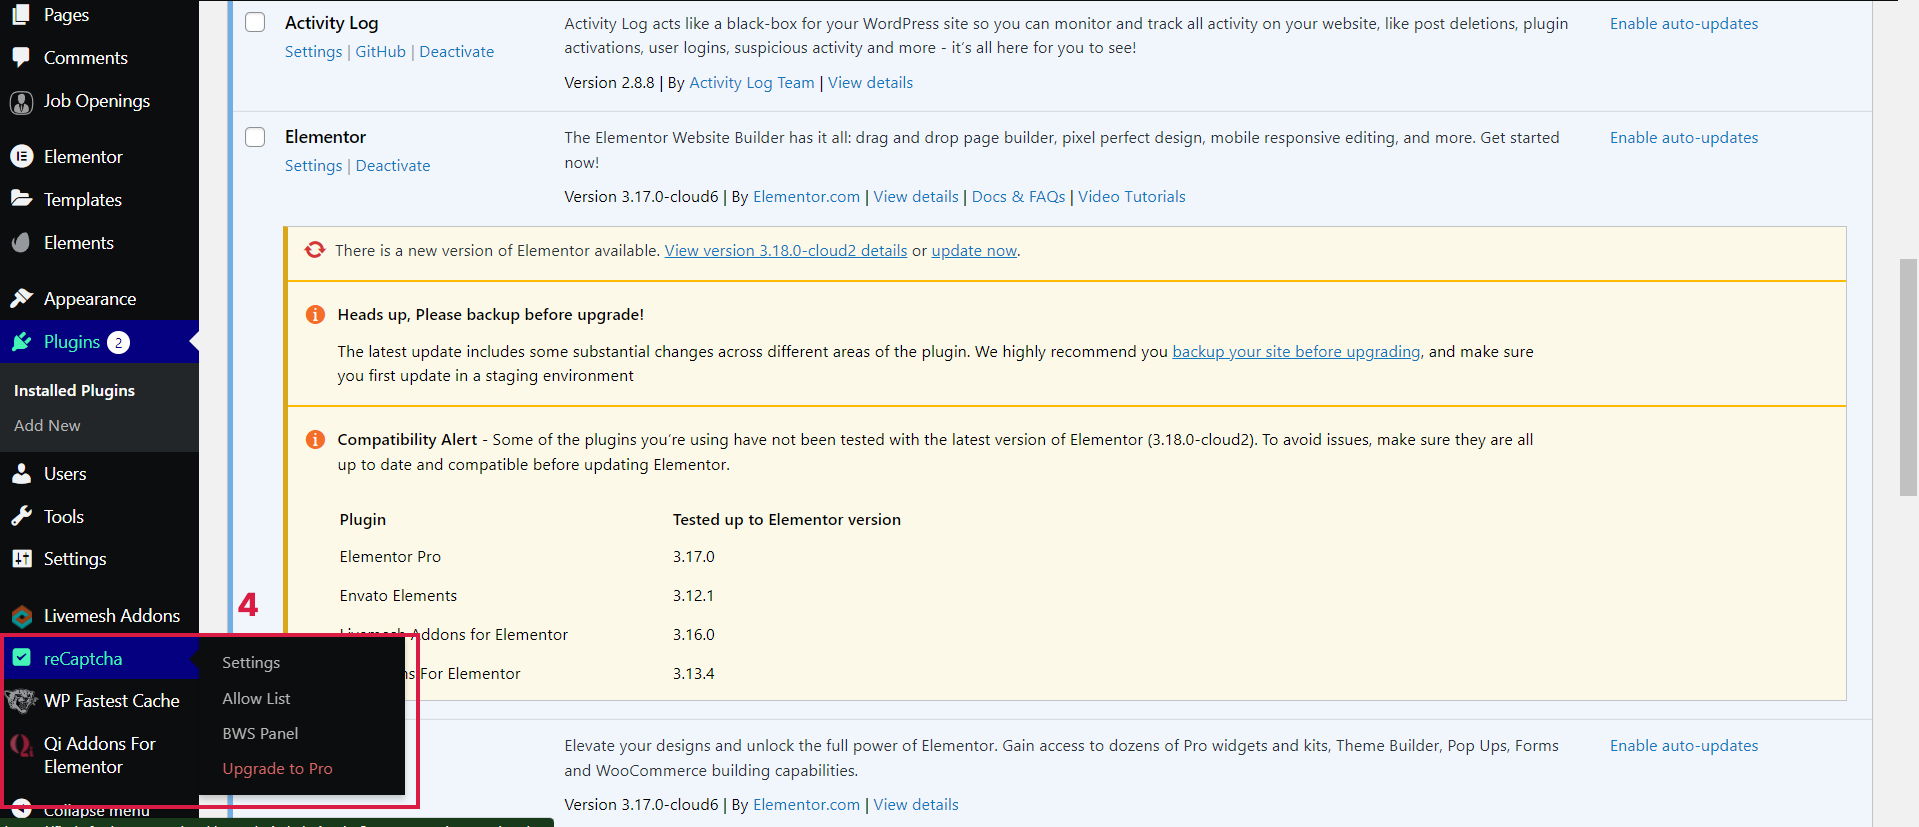
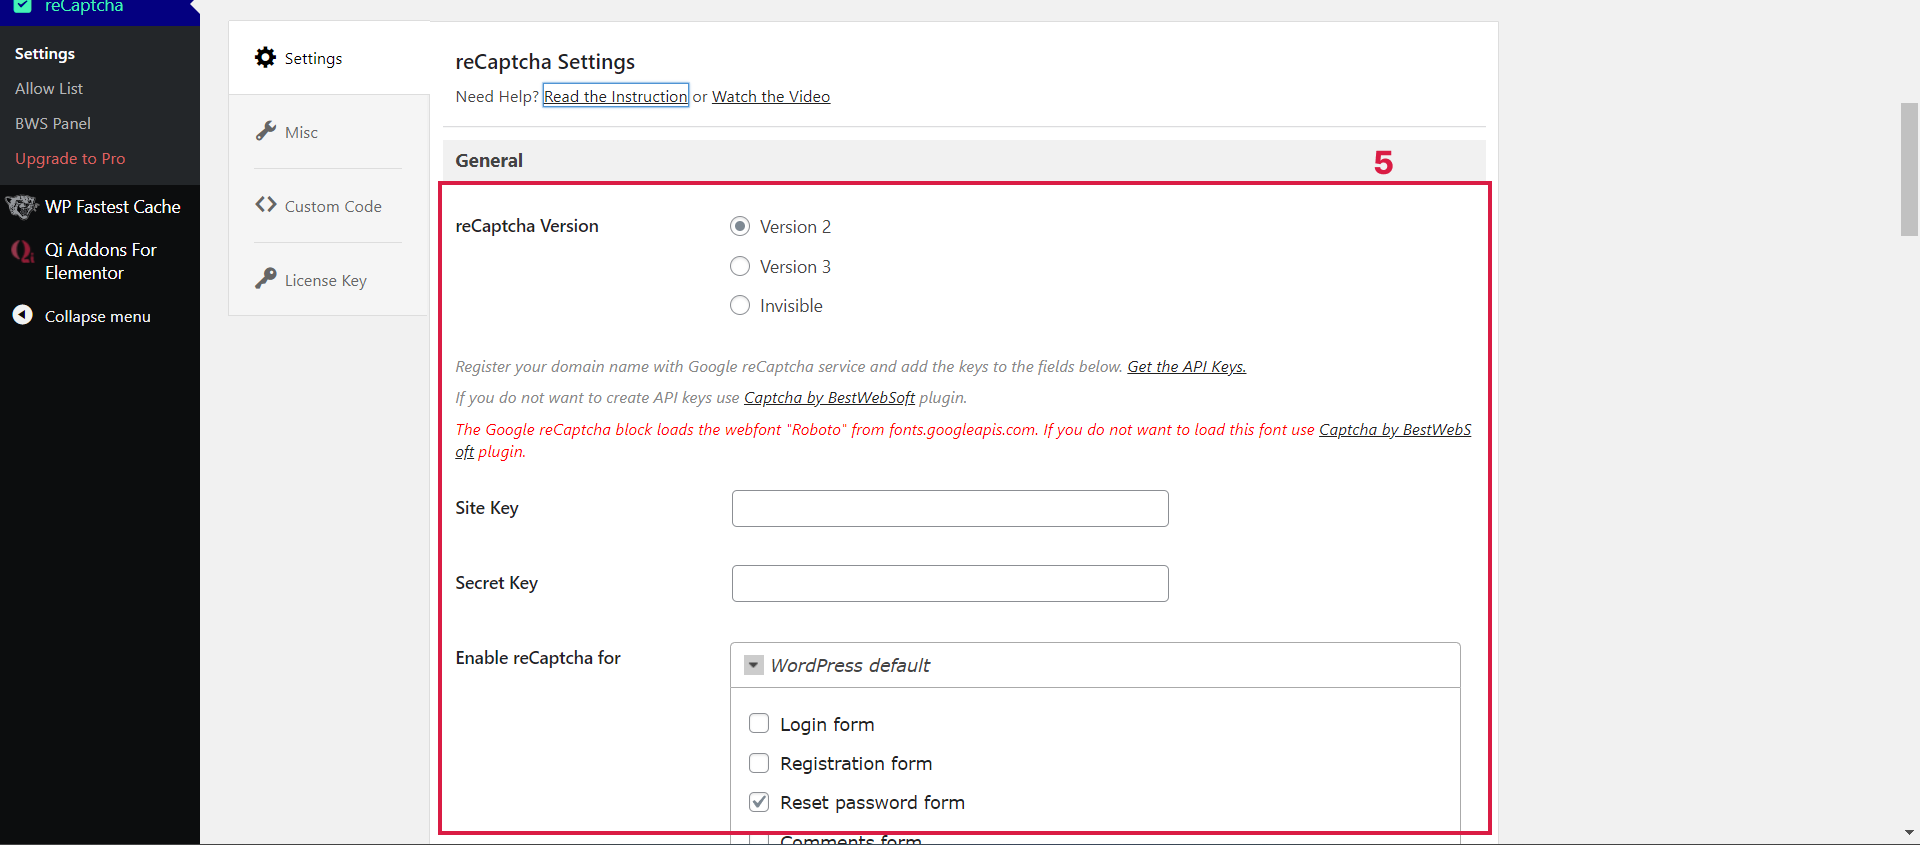
5. Provide all the necessary information: paste the Site Key and Secret Key generated in the first step and choose whether you want to opt for reCAPTCHA v2, v3 or Invisible. Choose where you wish reCAPTCHA to appear. You can choose from:
- WordPress default (free of charge):
- Login form,
- Registration form,
- Reset password form,
- Comments form,
- External Plugins:
- Contact Form,
- Testimonials,
6. You can also choose paid versions (in that case, before choosing where your reCAPTCHA should appear, click the “Upgrade to Pro” button and follow the instructions. Then, come back to this point of the guide). These are the options you will be then able to choose from:
- External Plugins:
- Gravity Forms,
- Ninja Forms,
- Jetpack Contact Form,
- MailChimp for WordPress,
- Subscriber,
- WPForms,
- Contact Form 7,
- Fast Secure Contact Form,
- Caldera Forms,
- Elementor Contact Form,
- WooCommerce:
- WooCommerce Login form,
- WooCommerce Registration form,
- WooCommerce Reset password form,
- WooCommerce Checkout form,
- BuddyPress:
- BuddyPress Registration form,
- BuddyPress Comments form,
- BuddyPress Add New Group form,
- Divi:
- Divi Contact Form,
- Divi Login Form,
- bbPress:
- bbPress New Topic form,
- bbPress Reply form,
- Forums wpForo:
- wpForo Login form,
- wpForo Registration form,
- wpForo New Topic form,
- wpForo Reply form,
- Ultimate Member:
- Ultimate Member Login form,
- Ultimate Member Registration form,
- Ultimate Member Profile form,
- MemberPress:
- MemberPress checkout form,
- MemberPress login form,
- MemberPress forgot password form,
- LearnDash:
- LearnDash login form,
- LearnDash registration form,
- BuddyBoss:
- BuddyBoss registration form;
7. Click the “Save Changes” button located in the page’s right section. That’s all!
How to install Advanced Google reCAPTCHA
1. Log in to your WordPress Dashboard, go to the “Plugins” tab located on the left sidebar, and click “Add New”;
2. In a search bar, type in the name of the plugin, in this case – “Advanced Google reCAPTCHA”;
3. After finding the plugin on the result list, click “Install Now” and after a while, when a button “Activate” appears, click it;
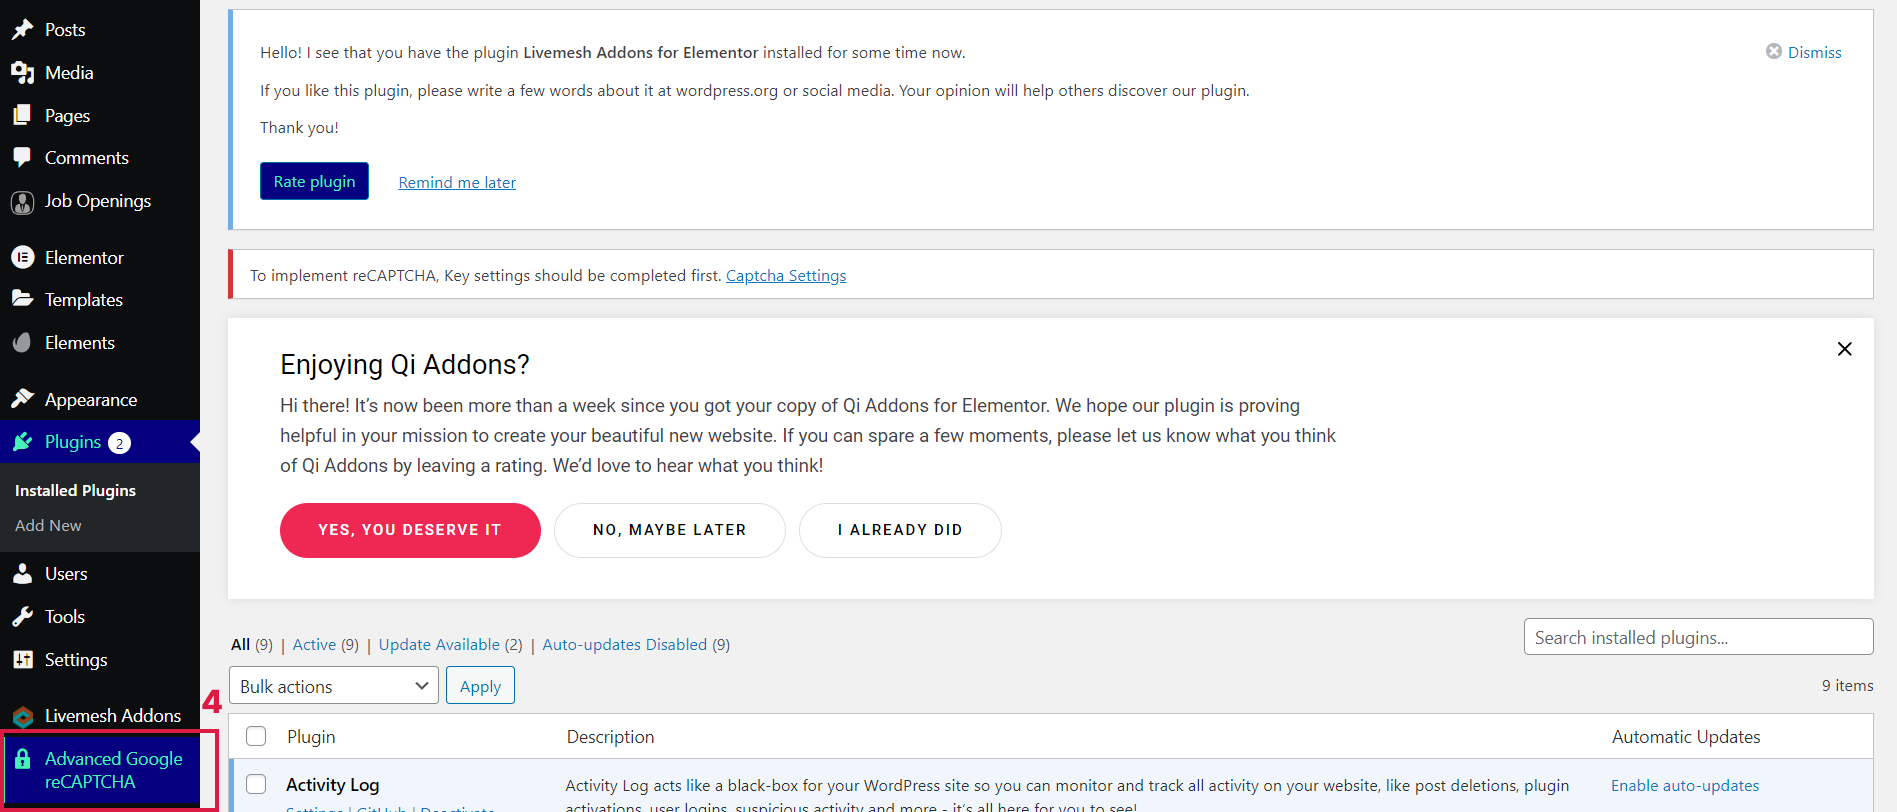
4. Proceed to the freshly appeared “Advanced Google reCAPTCHA” tab on the sidebar menu;
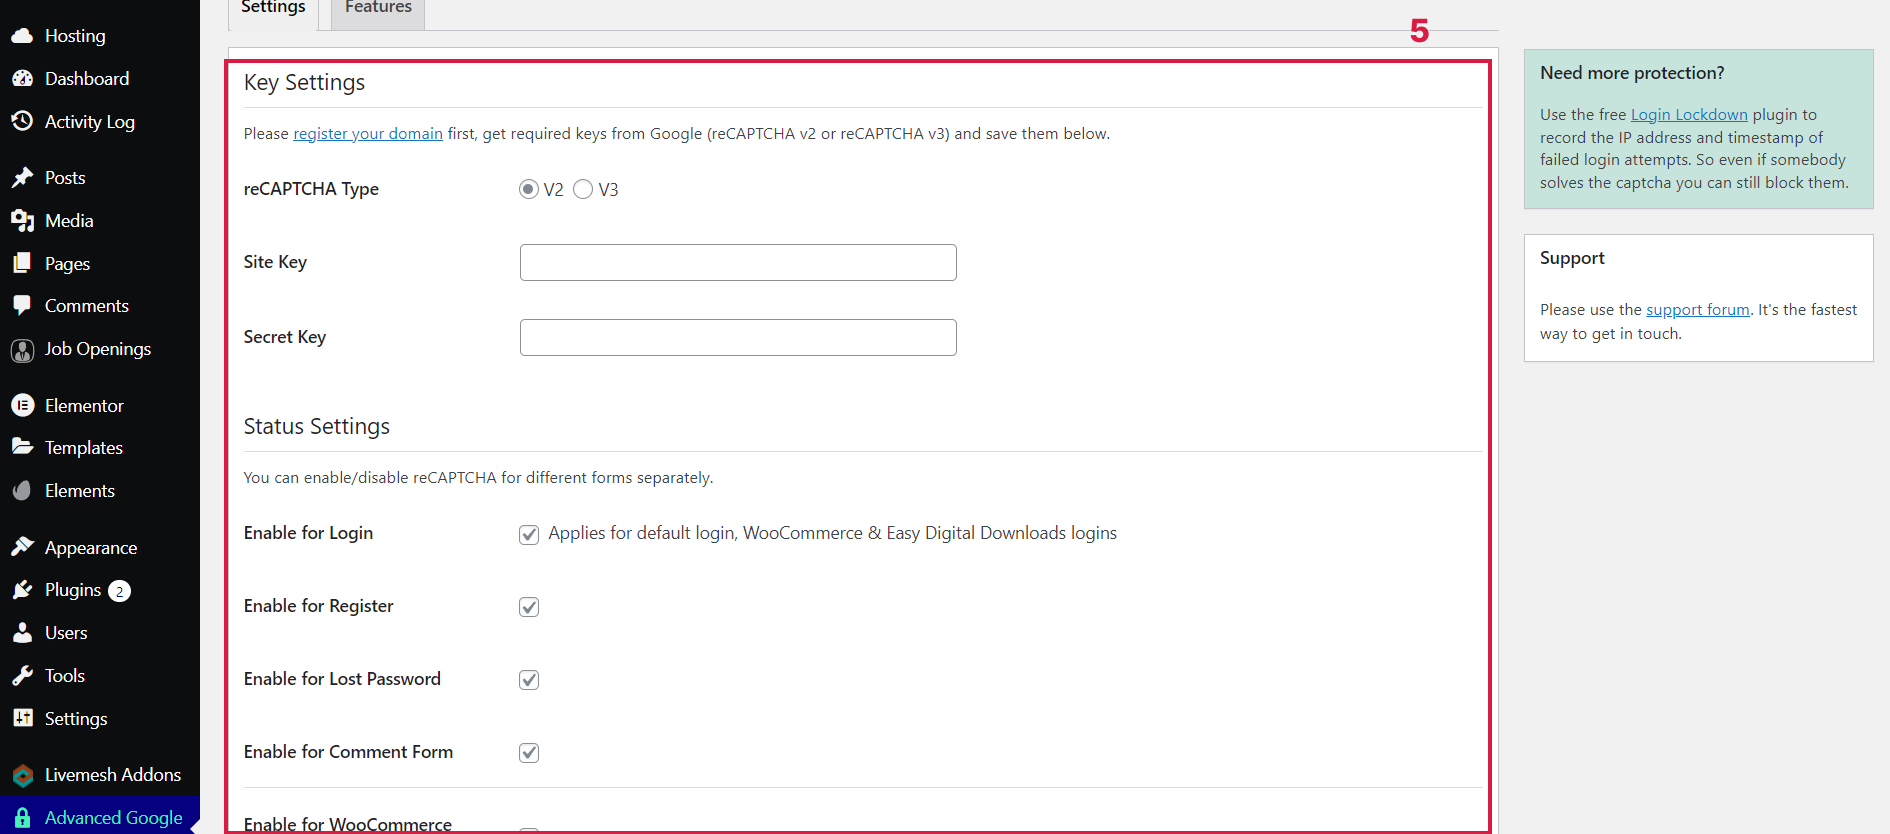
5. Provide all the necessary information: choose whether you want to opt for reCAPTCHA v2 or v3 and paste the Site Key and Secret Key generated in the first step. Choose where you wish reCAPTCHA to appear. You can choose from the following events:
- Login,
- Register,
- Lost Password,
- Comment Form,
- WooCommerce Register,
- WooCommerce Checkout,
- Easy Digital Downloads Register,
- BuddyPress Register;
6. Click “Save Changes” located under the form. That’s all!
You’ve just plugged safety!
Congratulations, your website is going to be a much safer place now that you added reCAPTCHA to it! But please don’t rest on laurels – the safety of your corner of the web consists of many elements. Apart from protecting yourself from bot attacks, you should also ensure that the content you create is appropriate for your visitors! A crucial aspect here is its compliance with Google’s policies. Learn if your content aligns Google Publisher Policies and Restrictions to provide your website with full Google support when monetizing it with their products!

